Showing posts with label Outlook. Show all posts

Wednesday, March 5, 2014

Organize Outlook Easily Using Quick Steps

Organizing and sending e-mails has never been easier now that I have discovered Quick Steps in Microsoft Outlook 2010. This short tutorial will show you just a couple of the many awesome ways you can make working in your Outlook e-mail easier and quicker.

First, notice at the top of your Outlook page a section in the middle titled Quick Steps. It probably has some default settings already which you can delete as you begin to manage your own Quick Steps. 

For some basic actions, you can begin by clicking on the down arrow in the Quick Steps box:


Your Quick Steps box will expand giving you two new options - "New Quick Step" and "Manage Quick Steps..." 

First, I will demonstrate how to create a quick step action for creating new mail. Hover your cursor over "New Quick Step" causing it to expand to show more options and then select "New E-mail to..." 


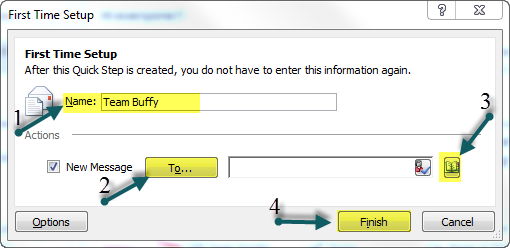
When the First Time Setup box appears, give the quick step a name (1) and then find the person or group for this new E-mail quick step by clicking on the "To" button (2) or on your address book icon (3). Make your selection and click finish (4):

You now have an icon in your Quick Steps box, that with one click, will open a new e-mail to that person or group!


You can also create a quick step to send a message to a folder of your choosing with the click of the mouse. Again, click on the down arrow in the Quick Steps box and select New Quick Step, but this time, select "Move to folder".

The First Time Setup box will pop open and you will name the quick step (1), click on the down arrow to choose your folder (2), and select your desired folder (3). Please note that if the folder you wish to select is not showing, simply click on "Other folder.." (4) and navigate to the folder you wish to use.

Also note that two options are pre-selected (5) - "Move to folder" and "Mark as read". You can also choose to explore more options for this quick step action by clicking on the "Options" button (6).


Now, every time you read a message that you wish to move to that particular folder, simply click on the Quick Step action and it is moved! You may also add actions to the quick step like, "Mark as Read" and many others by clicking on the "Add Action" button.

Finally, you may select to create a more customized quick step action by using the "Create New" icon located right in the Quick Steps box.


Play around and experiment so that your e-mail time is lessened and you gain more time for the things you would rather do, like search through Pinterest!!


Tuesday, January 14, 2014

Quick Parts in Outlook


The Catherine and our Fearless Leader, Linda have been excited about using the signatures tool in Outlook. Not just for the closing of your messages, it can be used for whole messages that can be composed and reused.

Quite by accident, I discovered that Outlook as another tool aimed  specifically at reusing sentences, paragraphs or whole messages. The Quick Parts tool is located on the Insert ribbon's Text section.

You can save many preformatted snippets for use in those emails that you send over and over again each semester. Or all those answers you don't want to retype every time.
For specific directions, go here to the Outlook Blog

Pretty simple, pretty slick!

Monday, October 28, 2013

Save Time Using Signatures in Outlook


 Are there e-mails that you find yourself typing over and over and over? In my day job and in my teaching, I find that I often get requests for certain information on a regular basis.

 I used to respond to each e-mail by taking the time to compose a new one with each request. The result was using a lot of my time. I'd also sometimes forget crucial information in my rush to get the e-mail answered.
   
Now I save time and aggravation using the signatures feature in Outlook! I have a signature for all of the frequently used e-mails that I get. I composed them once and use them all the time! It saves me time, frustration, and also ensures consistency among the people requesting information.

For step by step directions on how to use this feature in Outlook, please see the video below.


Monday, September 30, 2013

Outlook Tip

One of the things that really frustrated me about outlook was it did not accept commas for separating multiple e-mail addresses. If there was a comma  hiding in there, I'd get a "could not resolve name" message, and I'd have to comb through two hundred e-mail addresses to find the one comma.  Since I have to e-mail a large number of people quite often, it took me a lot of time to make sure that all of my addresses had a semi colon after it rather than a comma.

Imagine my joy when I found out that it's SIMPLE to set up Outlook to accept commas as well as the standard semi colon.

If this is something that makes you crazy, you can set it up to in a few simple steps.  Here is a detailed tutorial.  Enjoy your commas!

Thursday, May 2, 2013

Outlook Tip: Save Emails as .Plain Text - Open in Word

I got this tip from Heinz Tschabitscher who posts weekly Outlook tips at About.com. Sometimes I wish to store or share an email as a Word file. This is easy to do in Outlook using Heinz's tip for this week.

The Instructions from his post at About.com are:

To save an email as plain text in Outlook:
  1. Open the desired message in the Outlook preview pane.
    • To save multiple messages to one text file, highlight them all in the mailbox.
  2. In Outlook 2007:
    • Select Save As from the message's Office button.
  3. In Outlook 2003:
    • Choose File | Save As... from the menu.
  4. Make sure Text Only (or Text Only (*.txt)) is selected under Save as type:.
  5. Type the desired file name under File name.
  6. Choose the folder to save your emails in under Save in:.
  7. Click Save
That's it. You can now open Word, navigate to the file and open it in Word. Once open in Word, you can save the file as a Word document.

Sunday, August 19, 2012

Outlook - Manually Enter a New RSS Feed Subscription in Outlook

With Butler's move to Outlook, several new tools and options are available to you. One is the ability to easily subscribe to blogs - like this one! Shanna Zimmerman suggested this post and provided the instructions below. Thanks Shanna. I am sure everyone will find this post useful.

To manually enter an RSS Feed subscription, you are required to enter the Web address.
  1. Click the File tab.
  2. Click Account Settings, and then click Account Settings.
  3. On the RSS Feeds tab, click New.
  4. In the New RSS Feed dialog box, type the URL of the RSS Feed. For example, http://www.example.com/feed/main.xml.
  5. Tip: In most Web browsers, on a Web page, you can right-click the  RSS icon, and then copy the shortcut to the Clipboard. Press CTRL+V to paste the information from the Clipboard into the RSS Feed location box.
  6. Click Add.
  7. Click OK.

Tuesday, June 19, 2012

Outlook - Cheat Sheet

Some of us do not have access to Outlook at Butler yet . . . but eventually we will. When that happens this cheat sheet might prove valuable to you in becoming a fluent Outlook user. The graphic below will take you to the download site. Enter the password "makeuseof" and click "Download" to download the PDF.